
13 Spooky Halloween Party Finger Foods for Your Bash

Whether you’re hosting a full costume party or just need something easy to bring along, finger foods do the heavy lifting at Halloween. The best ones lean on familiar ingredients, a little heat or sweetness, and shapes that look festive without demanding a pastry degree, so you can spend the party with your guests instead of your oven.
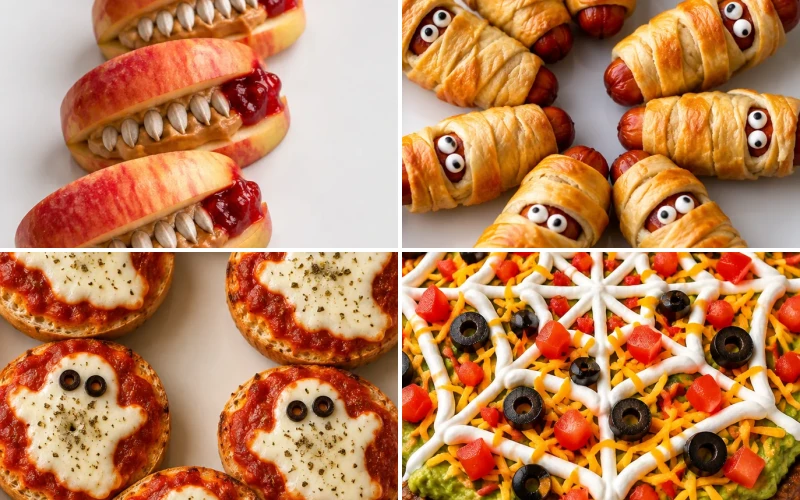
The lineup below covers plenty of ground. Go with the mummy dogs if you want the most crowd friendly option, the stuffed mushroom eyeballs when you need something that looks properly creepy, the pumpkin shaped cheeseball for a centerpiece that doubles as a snack, and the apple monster mouths if you’re feeding a younger crowd.
Which Halloween Party Finger Foods Should You Make?
| Recipe | Flavor profile | Best for |
|---|---|---|
| Mummy Dogs With Spicy Mustard Dip | Savory, salty, tangy | Kids and picky eaters |
| Stuffed Mushroom Eyeballs | Garlicky, creamy, earthy | A spooky visual |
| Pumpkin Shaped Cheeseball | Sharp, smoky, herby | A party centerpiece |
| Spider Web Taco Dip | Cheesy, spicy, fresh | Feeding a crowd |
| Monster Apple Mouths | Sweet, tart, nutty | A healthier snack |
| Bat Wing Chicken Tenders | Crispy, savory, smoky | Game day energy |
| Witch Finger Breadsticks | Buttery, garlicky, crisp | A creepy bread basket |
| Ghost Pizza Bagels | Cheesy, tangy, soft | A quick kids’ activity |
| Mummy Meatballs With Dipping Sauce | Juicy, sweet, garlicky | Make ahead ease |
| Deviled Egg Spiders | Creamy, tangy, peppery | Retro party charm |
| Jack O’ Lantern Stuffed Peppers | Hearty, savory, cheesy | A warm, filling bite |
| Candy Corn Fruit Skewers | Fresh, juicy, creamy | A light dessert option |
| Graveyard Taco Cups | Crunchy, beefy, sharp | Build your own fun |
Mummy Dogs With Spicy Mustard Dip
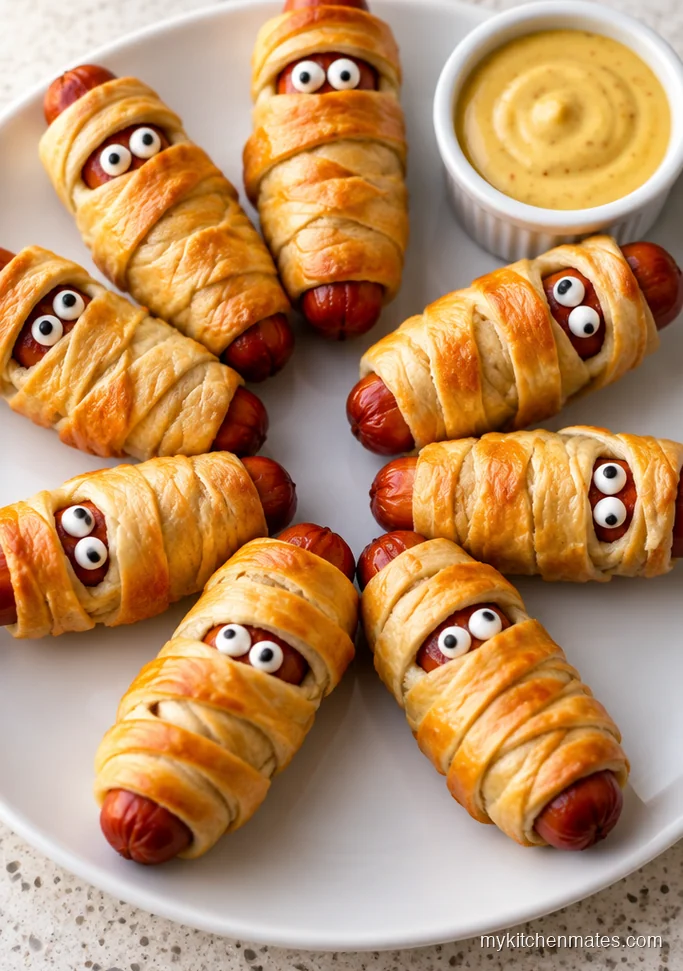
This is the one to start with because it looks like you fussed, but you’re really just wrapping dough around hot dogs and letting the oven do the rest. I keep the dip on the warmer side so the adults have something with a little kick while the kids dunk theirs in plain ketchup.
Ingredients (makes 16 mummy dogs)
- Refrigerated crescent roll dough: 2 cans, 8 rolls each
- Beef hot dogs: 16
- Dijon mustard: 60 ml (1/4 cup)
- Honey: 1 tbsp
- Hot sauce: 1 tsp
- Large egg, beaten: 1
- Candy eyeballs: 32
Instructions
Step 1: Heat your oven to 375F (190C) and line two baking sheets with parchment. Unroll the crescent dough and pinch the seams together so you get one solid sheet per can, then cut each sheet into thin strips about 1 cm wide.
Step 2: Wrap 2 strips around each hot dog, crisscrossing them and leaving a small gap near one end for the face. You want the dough snug but not stretched tight, because it will puff as it bakes and you still need the mummy look.
Step 3: Brush each wrapped dog with the beaten egg, getting into the seams so the strips stick together. Bake for 13 to 15 minutes, or until the dough turns golden brown and the hot dogs start to glisten at the edges.
Step 4: Stir the Dijon mustard, honey, and hot sauce in a small bowl until the honey disappears completely. Taste it and add a little more hot sauce if you like real heat, since this dip is meant to wake up the salty dog.
Step 5: Press 2 candy eyeballs into the gap on each warm mummy dog, using the melted cheese from the dough or a dot of mustard to hold them in place. Pile them on a black platter and set the dip in the middle so everyone can reach it.
Stuffed Mushroom Eyeballs
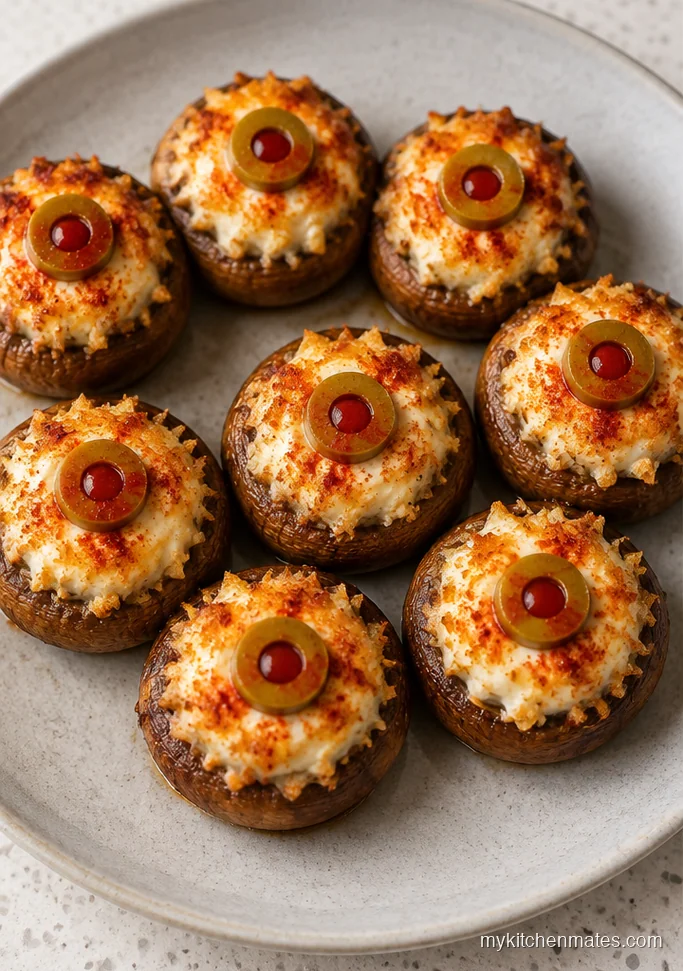
These look genuinely unhinged on a platter, which is exactly the point. The mushrooms stay meaty and hold their shape, the filling gets creamy and garlicky, and a single olive pressed into the top turns each one into something that stares back at you.
Ingredients (makes 20 stuffed mushrooms)
- Large cremini mushrooms: 20, about 450 g (1 lb)
- Cream cheese, softened: 225 g (8 oz)
- Panko breadcrumbs: 45 g (1/2 cup)
- Garlic powder: 1 tsp
- Smoked paprika: 1/2 tsp
- Salt: 1/2 tsp
- Green olives with pimentos: 20
- Olive oil: 1 tbsp
Instructions
Step 1: Heat your oven to 400F (200C). Wipe the mushrooms clean with a damp paper towel, then twist out the stems and discard them or save them for stock, since hollowing the caps is all you need for the filling.
Step 2: Mash the cream cheese, panko, garlic powder, smoked paprika, and salt in a bowl until the mixture holds together when you squeeze it. You want it thick enough to mound, not so soft that it oozes out while baking.
Step 3: Spoon about a teaspoon of filling into each mushroom cap, pressing it down gently and rounding the top. The caps shrink as they roast, so pile the filling a little higher than looks right at first.
Step 4: Dab a tiny bit of olive oil on each olive so it shines, then press one into the center of every filled mushroom. Bake for 18 to 20 minutes, or until the mushrooms release their juices and the filling turns golden at the peaks.
Step 5: Let them cool for 3 minutes so the cheese sets enough to pick up without burning your fingers. Arrange the mushroom eyes in a spiral on a dark tray and watch which guest grabs the first one.
Pumpkin Shaped Cheeseball
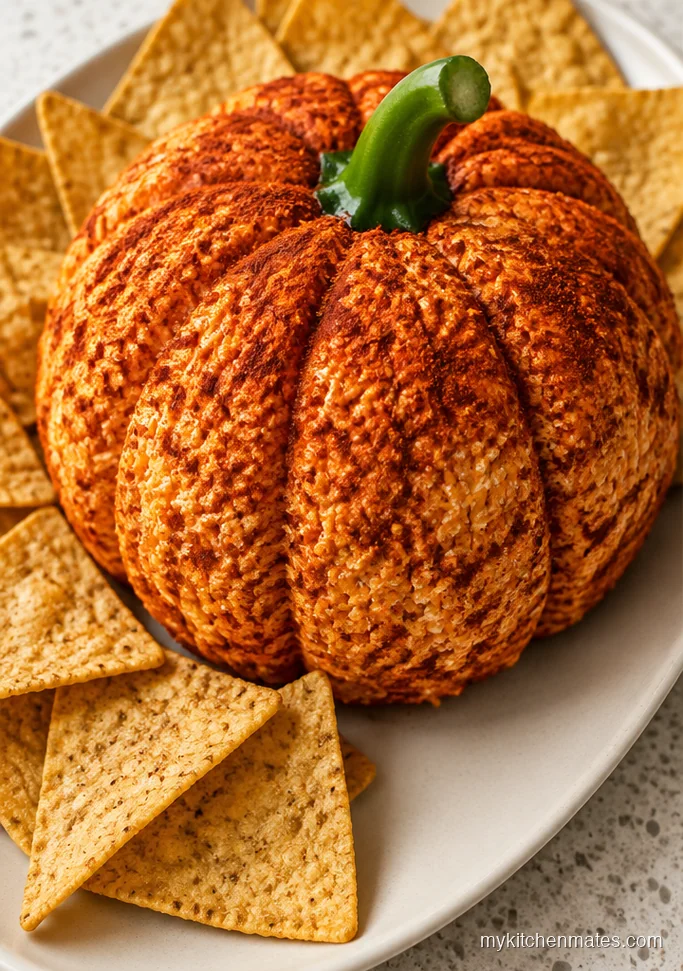
This one earns its spot as a centerpiece because it looks like a pumpkin but works like a standard cheeseball, and you can build it in the time it takes the oven to preheat for something else. I lean on smoked cheddar for depth, but any sharp cheddar will do.
Ingredients (makes 1 large cheeseball, about 12 servings)
- Cream cheese, softened: 450 g (16 oz)
- Smoked cheddar, finely shredded: 225 g (8 oz)
- Garlic powder: 1 tsp
- Onion powder: 1/2 tsp
- Worcestershire sauce: 1 tsp
- Salt: 1/4 tsp
- Paprika: 1 tsp
- Bell pepper stem: 1
- Crackers or pretzels, for serving: as needed
Instructions
Step 1: Beat the cream cheese in a large bowl until it feels loose and spreadable, then mix in the smoked cheddar, garlic powder, onion powder, Worcestershire sauce, and salt. You want everything evenly distributed but not beaten so long the cheese starts to break down.
Step 2: Turn the mixture onto a sheet of plastic wrap and gather the wrap around it, twisting the top to form a rough ball. Chill it for 1 hour so the cheese firms up enough to hold the pumpkin ridges you’ll carve next.
Step 3: Unwrap the chilled ball and set it on your serving plate. Press the back of a butter knife in vertical lines from top to bottom all the way around, spacing the ridges about 2 cm apart so it reads as a pumpkin and not a striped ball.
Step 4: Dust the whole thing with paprika, brushing it gently so the color settles into the grooves. Push the bell pepper stem into the top and you’ve got a pumpkin that people will actually want to cut into.
Step 5: Set the crackers and pretzels around the base and put a small knife next to the plate. Serve it cool but not ice cold, since the smoked cheddar flavor opens up as it sits at room temperature.
Spider Web Taco Dip
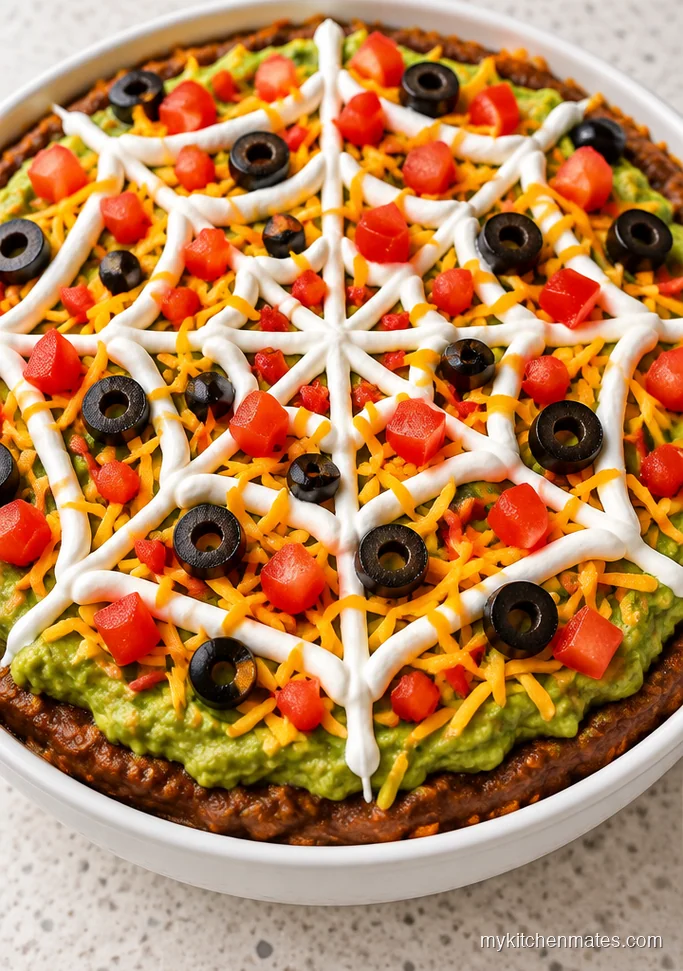
This is the dip you put down and then spend ten minutes trying to pull people away from. It layers cold and room temperature ingredients, so there is no cooking involved, and the sour cream web on top does all the Halloween work for you.
Ingredients (makes 8 servings)
- Refried beans: 450 g (15 oz)
- Taco seasoning: 2 tbsp
- Guacamole: 250 g (1 cup)
- Sour cream: 250 g (1 cup)
- Shredded cheddar cheese: 225 g (8 oz)
- Diced tomatoes: 150 g (1/2 cup)
- Sliced black olives: 60 g (1/4 cup)
- Tortilla chips, for serving: as needed
Instructions
Step 1: Stir the refried beans and taco seasoning together in a bowl until the seasoning disappears completely. Spread the mixture across the bottom of a 23 cm (9 inch) pie dish or similar shallow pan.
Step 2: Dollop the guacamole over the beans in small spoonfuls, then use the back of a spoon to spread it to the edges without mixing the layers. You want clean divisions so the dip looks stacked when someone scoops through it.
Step 3: Spoon the sour cream into a small zip top bag and snip off a tiny corner. Pipe a spiral starting at the center of the guacamole, working outward in a circle, then drag a toothpick from the center to the edge every few centimeters to create the web.
Step 4: Scatter the shredded cheddar in a ring around the outer edge, then top with the diced tomatoes and black olives. The colors should read like a cobweb caught a handful of dark and bright bits.
Step 5: Put the tortilla chips in a wide bowl next to the dish so people can scoop from the side nearest them. This dip holds for about an hour at room temperature before the sour cream starts to soften too much.
Monster Apple Mouths
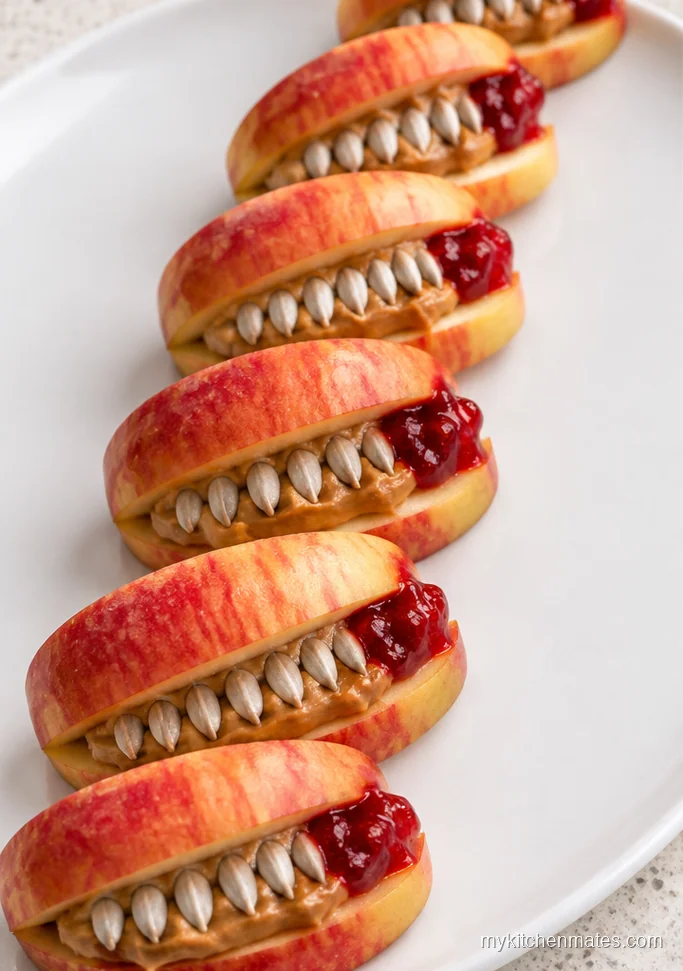
These are the ones the kids assemble themselves if you let them, and they disappear faster than anything fried. The tart apple against the nut butter and the candy teeth makes a snack that feels like a treat without sending anyone into a sugar spiral before the party really starts.
Ingredients (makes 12 apple mouths)
- Large crisp apples, like Honeycrisp: 3
- Creamy peanut butter: 80 g (1/3 cup)
- Sunflower seeds: 60 g (1/4 cup)
- Strawberry jam: 2 tbsp
- Lemon juice: 1 tsp
Instructions
Step 1: Slice each apple into 12 wedges, cutting from top to bottom around the core and discarding the seeds. Toss the wedges with the lemon juice in a bowl so they keep their color while you set up the rest.
Step 2: Pair up apple wedges that match in size, since each monster mouth needs a top and a bottom piece that fit together. Spread about a teaspoon of peanut butter on the flat side of each wedge.
Step 3: Press 5 or 6 sunflower seeds into the peanut butter on half the wedges, angling them like teeth pointing inward. Dot a little strawberry jam on the other half to be the tongue, right along the inner edge.
Step 4: Sandwich a top wedge onto each bottom wedge so the seeds poke out like an underbite and the jam shows through the front. Serve them on a tray lined with parchment, and keep the leftovers chilled.
Bat Wing Chicken Tenders
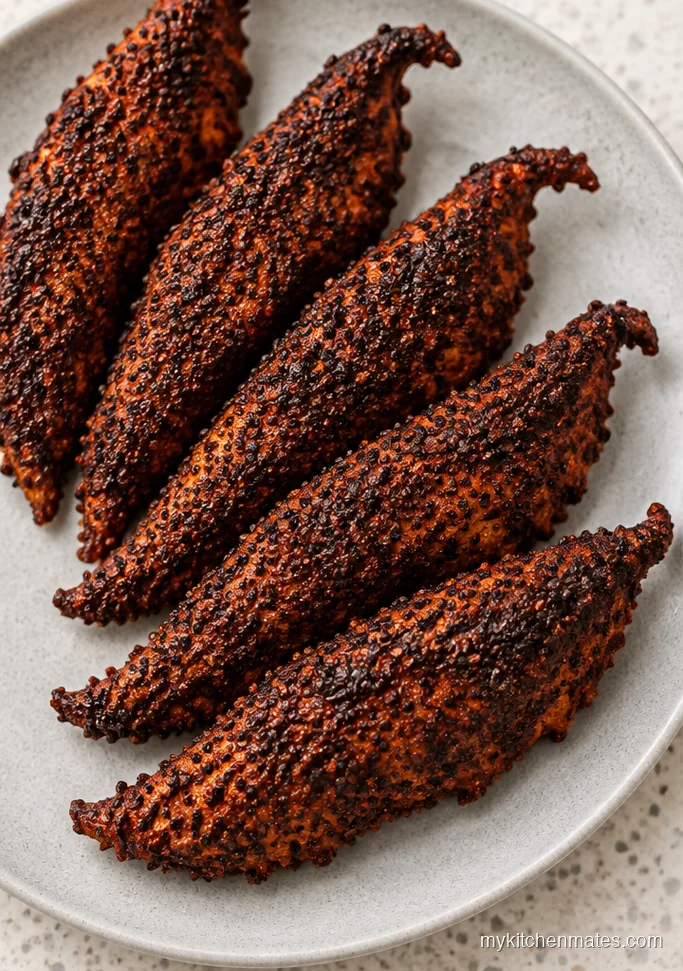
These come out of the oven with a dark, smoky crust that looks like something gothic and tastes like your favorite chicken tenders. The wing shape comes from a quick cut through the meat, and the color comes from a spice blend, not food dye.
Ingredients (makes 12 bat wing tenders)
- Chicken breast tenderloins: 12, about 550 g (1.2 lb)
- Buttermilk: 120 ml (1/2 cup)
- All purpose flour: 60 g (1/2 cup)
- Black sesame seeds: 3 tbsp
- Smoked paprika: 2 tsp
- Garlic powder: 1 tsp
- Cayenne pepper: 1/2 tsp
- Salt: 1 tsp
- Vegetable oil: 2 tbsp
Instructions
Step 1: Heat your oven to 425F (220C) and oil a large baking sheet. Cut a 2 cm slit lengthwise down the center of each tender, stopping about halfway through the thick end so the two flaps can spread into wings.
Step 2: Pour the buttermilk into one shallow dish and stir the flour, black sesame seeds, smoked paprika, garlic powder, cayenne, and salt in another. Dunk each chicken piece in the buttermilk, let the excess drip off, then press it into the flour mixture until fully coated.
Step 3: Lay the tenders on the baking sheet with the slit spread apart and the sesame seeds facing up. Drizzle the vegetable oil over the tops, which helps the coating darken and crisp without needing a deep fryer.
Step 4: Bake for 18 to 20 minutes, or until the chicken reaches 165F (74C) inside and the coating looks almost black at the edges. The dark sesame and paprika do the Halloween color work here.
Step 5: Pile them on a black plate and set out a bowl of ranch or blue cheese dressing. These are best hot, so bring them out in batches if you’re making them ahead.
Witch Finger Breadsticks
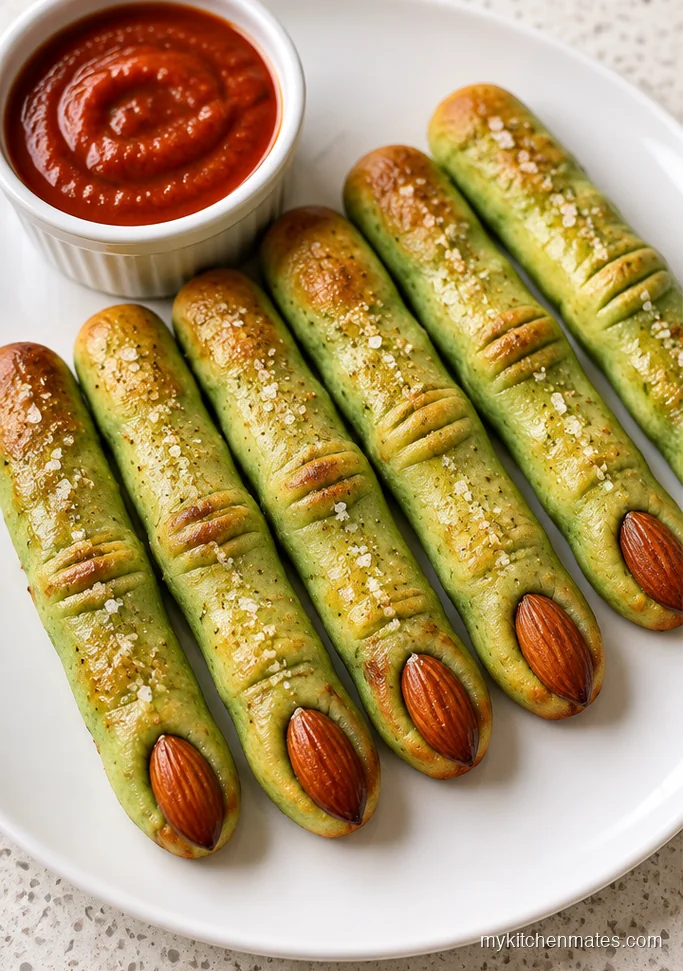
These breadsticks are just pizza dough shaped into long, knobby fingers with an almond fingernail, but the effect is genuinely unsettling on a platter. A little green food coloring in the brushing oil gives them that witchy skin tone, and the sea salt flakes look like rough knuckles.
Ingredients (makes 14 witch fingers)
- Refrigerated pizza dough: 450 g (1 lb)
- Whole almonds: 14
- Olive oil: 3 tbsp
- Green food coloring: 3 drops
- Garlic salt: 1 tsp
- Flaky sea salt: 1/2 tsp
- Marinara sauce, warm, for serving: 240 ml (1 cup)
Instructions
Step 1: Heat your oven to 400F (200C) and line a baking sheet with parchment. Divide the pizza dough into 14 equal pieces, then roll each piece into a rope about 12 cm long and slightly thinner at one end.
Step 2: Pinch the dough halfway down each rope to make a knuckle bump, then press a whole almond into the thinner end so it looks like a fingernail. You want the almond to sit mostly on top of the dough, not buried in it.
Step 3: Stir the olive oil and green food coloring together in a small bowl until the color is even, then brush it over every finger. Sprinkle with the garlic salt and flaky sea salt, getting the salt into the knuckle creases.
Step 4: Bake for 12 to 14 minutes, or until the fingers puff and turn a ghoulish green gold. Let them cool for 2 minutes before moving them, since the almond nails loosen if you slide them too soon.
Step 5: Stand the breadsticks upright in a tall glass with the almonds pointing down, like a jar of fingers. Serve the warm marinara on the side for dipping, and watch them go.
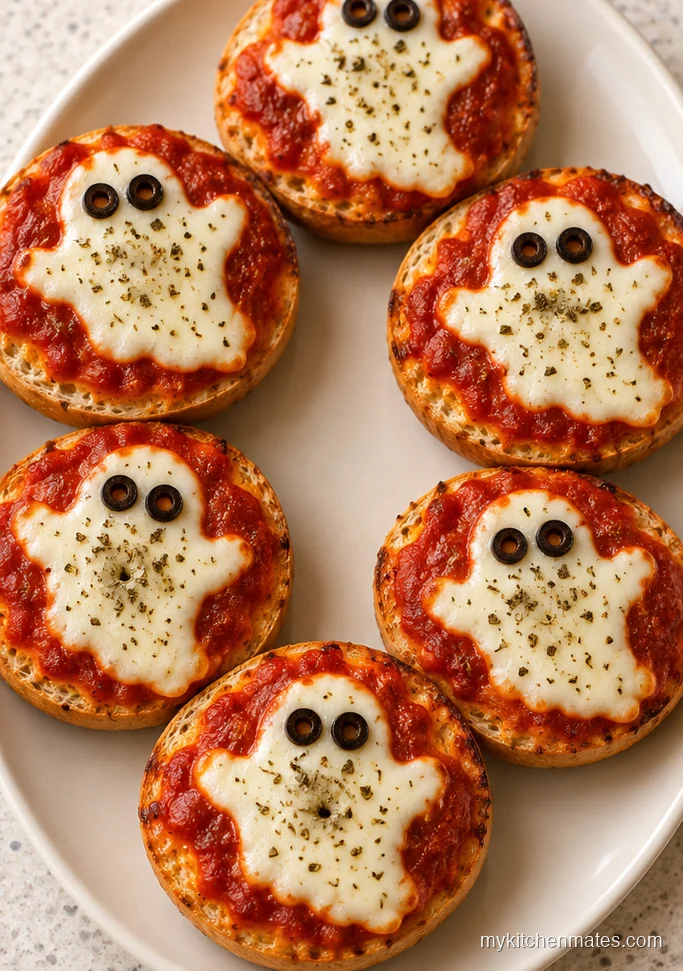
Ghost Pizza Bagels
These are the right answer when you need something the kids can build themselves and the adults will actually eat. A pile of halved bagels, a pot of sauce, some mozzarella slices, and a tray of tiny eyes, and suddenly the kitchen is the craft table.
Ingredients (makes 12 ghost bagels)
- Plain bagels, halved: 6
- Pizza sauce: 120 ml (1/2 cup)
- Mozzarella cheese slices: 12
- Sliced black olives: 24 small rounds
- Dried oregano: 1 tsp
- Olive oil: 1 tbsp
Instructions
Step 1: Heat your oven to 375F (190C) and set the bagel halves cut side up on a baking sheet. Spread about 2 teaspoons of pizza sauce on each half, going all the way to the edges so every bite has a little tang.
Step 2: Lay one mozzarella slice over each bagel half, then use your fingers to stretch and notch the bottom edge into a wavy ghost tail. You want the cheese to drape past the bagel edge a bit, since that is what makes it look like a ghost instead of a circle.
Step 3: Press 2 black olive rounds onto each cheese slice for the eyes and another smaller one lower down for the mouth. Drizzle the tiniest bit of olive oil over the cheese and dust with the dried oregano.
Step 4: Bake for 10 to 12 minutes, or until the cheese melts over the sides and the bagel bottoms go crisp. Keep an eye on the last minute, because the cheese can slide off if the bagel tilts.
Step 5: Serve them on a dark tray so the white ghosts pop, and set out extra olives for anyone who wants to add their own face. These should be eaten while warm, since cold bagel pizza loses its charm fast.
Mummy Meatballs With Dipping Sauce
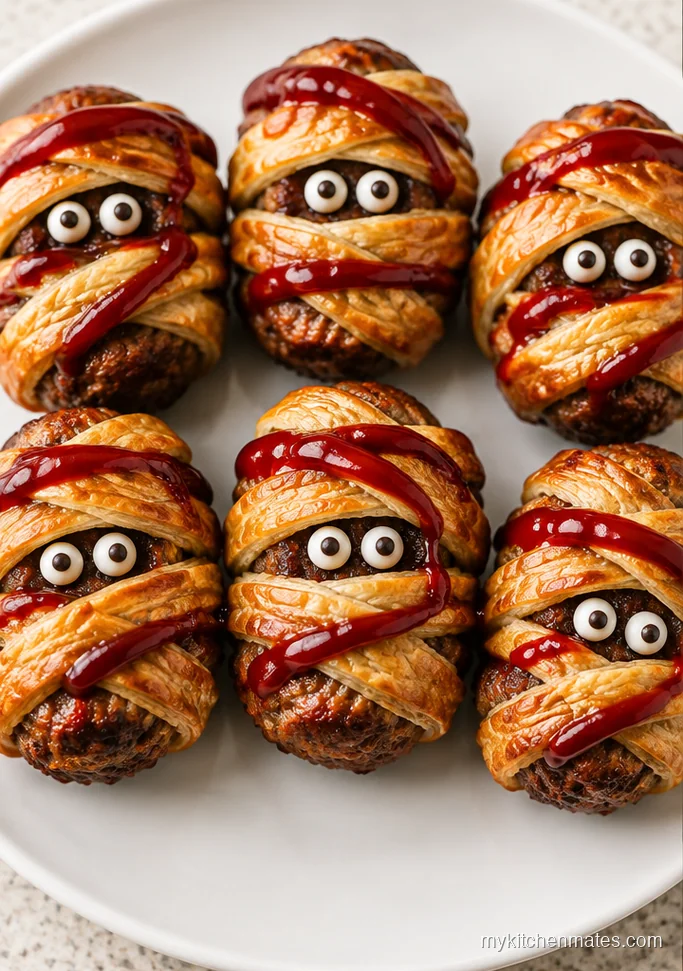
These are the make ahead heroes of the party, since you can roll and wrap the meatballs the night before and just bake them off when the doorbell starts ringing. The pastry strips crisp up around juicy beef, and the sweet tangy dip does the heavy lifting on flavor.
Ingredients (makes 24 mummy meatballs)
- Ground beef: 700 g (1.5 lb)
- Panko breadcrumbs: 45 g (1/2 cup)
- Large egg: 1
- Garlic powder: 1 tsp
- Onion powder: 1 tsp
- Salt: 1 tsp
- Black pepper: 1/2 tsp
- Puff pastry, thawed: 400 g (14 oz)
- Ketchup: 80 ml (1/3 cup)
- Brown sugar: 2 tbsp
- Apple cider vinegar: 1 tbsp
Instructions
Step 1: Heat your oven to 400F (200C) and line a baking sheet with parchment. Mix the ground beef, panko, egg, garlic powder, onion powder, salt, and pepper with your hands until just combined, since overmixing turns the meatballs tough.
Step 2: Roll the mixture into 24 balls about the size of a walnut, placing them on the sheet as you go. You can do this up to a day ahead and chill them, which actually helps them hold their shape when they bake.
Step 3: Cut the thawed puff pastry into thin strips about 1 cm wide. Wrap one strip around each meatball, crossing over itself twice and leaving a small gap on top so you have a space for the eyes.
Step 4: Bake for 20 to 22 minutes, or until the beef is cooked through and the pastry turns deep golden. The meatballs will release some juices, so don’t worry if the bottoms look a little wet, they firm up as they cool.
Step 5: Simmer the ketchup, brown sugar, and apple cider vinegar in a small pan for 3 minutes, until the sauce goes glossy and thick enough to coat a spoon. Serve the mummy meatballs with the warm dip in a bowl and toothpicks on the side.
Deviled Egg Spiders
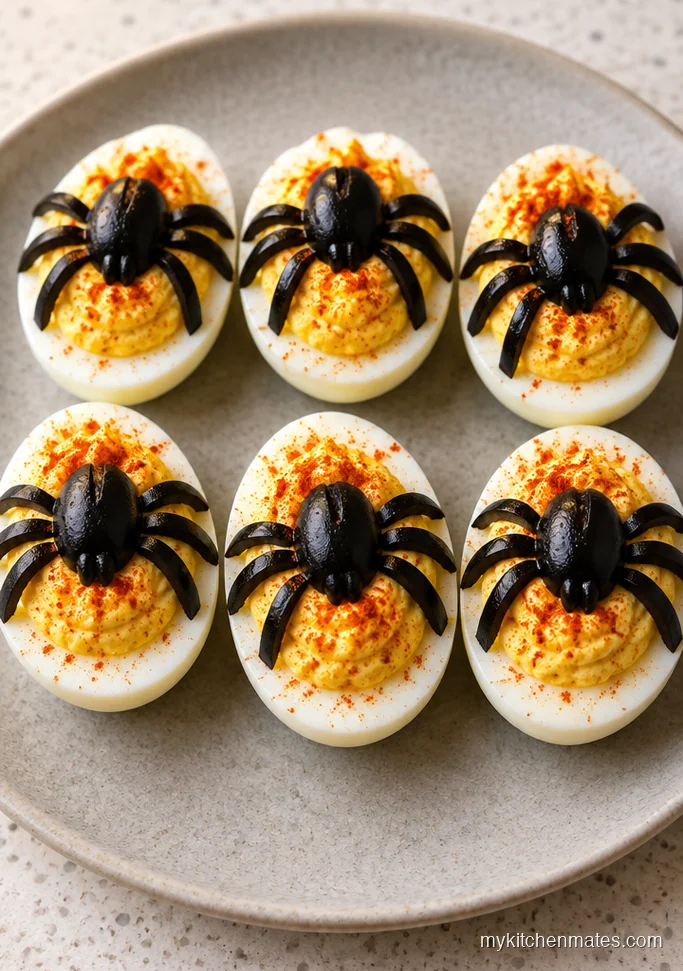
If there is one retro party food that always comes back, it is deviled eggs, and this version turns the classic into something a little creepy with olive spiders perched on top. The filling is tangy and rich, and the spiders are just a few quick cuts.
Ingredients (makes 12 deviled egg spiders)
- Large eggs: 6
- Mayonnaise: 60 g (1/4 cup)
- Dijon mustard: 1 tsp
- Lemon juice: 1 tsp
- Paprika: 1/2 tsp, plus more for dusting
- Salt: 1/4 tsp
- Large black olives: 12
Instructions
Step 1: Put the eggs in a saucepan and cover with cold water by about 3 cm. Bring the water to a boil over high heat, then cover the pan, turn off the heat, and let them sit for 11 minutes, which gives you yellow yolks with no gray ring.
Step 2: Drain the eggs and run them under cold water until they feel completely cool. Peel them gently, keeping the whites whole, then slice each egg in half lengthwise and pop the yolks into a bowl.
Step 3: Mash the yolks with the mayonnaise, Dijon mustard, lemon juice, paprika, and salt until the mixture is smooth and thick like frosting. You can add another teaspoon of mayo if it feels dry or crumbly.
Step 4: Spoon or pipe the yolk mixture back into the egg white halves, mounding it a little above the surface. To make each spider, cut one black olive in half lengthwise for the body, then slice the other half into 8 thin legs.
Step 5: Arrange 8 olive legs on the filling, four on each side, and set the olive body half in the middle. Dust the whole platter with a little paprika and serve the spider eggs cold.
Jack O’ Lantern Stuffed Peppers
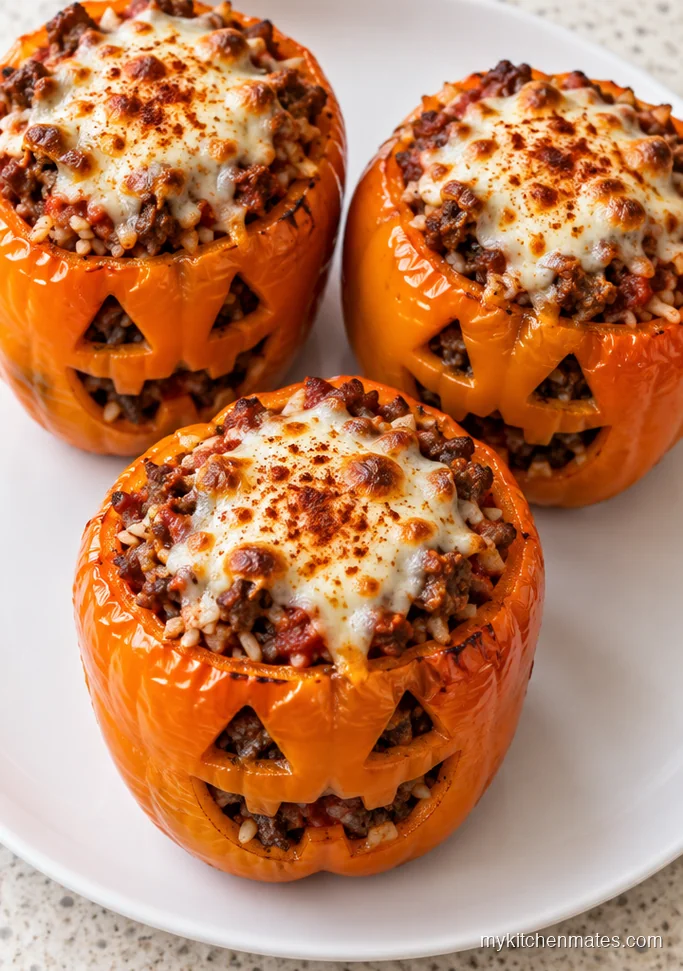
These are the warm, substantial option on a table full of cold snacks, and they double as decoration. Orange bell peppers carve into little lantern faces, and the filling is a hearty mix of beef, rice, and tomato that keeps people full through a long evening.
Ingredients (makes 6 stuffed pepper halves)
- Medium orange bell peppers: 3
- Ground beef: 350 g (3/4 lb)
- Cooked white rice: 150 g (3/4 cup)
- Tomato sauce: 120 ml (1/2 cup)
- Shredded mozzarella: 80 g (1/3 cup)
- Smoked paprika: 1 tsp
- Garlic powder: 1 tsp
- Salt: 1/2 tsp
- Olive oil: 1 tbsp
Instructions
Step 1: Heat your oven to 375F (190C) and line a baking dish with a little oil. Cut each orange pepper in half from top to bottom and scoop out the seeds and white ribs, then use a small paring knife to cut triangle eyes and a jagged mouth into one side of each half.
Step 2: Brown the ground beef in a large skillet over medium high heat, breaking it apart with a spoon as it cooks. You want it deeply browned and slightly crispy at the edges, which takes about 6 minutes, then drain off any extra fat.
Step 3: Stir the cooked rice, tomato sauce, smoked paprika, garlic powder, and salt into the beef until everything is coated and steamy. Taste the filling and add more salt if it needs it, since the peppers themselves are on the sweet side.
Step 4: Spoon the beef mixture into the pepper halves, packing it in gently and mounding the tops. Set them in the prepared dish, cover with foil, and bake for 25 minutes so the peppers soften and the filling heats through.
Step 5: Uncover and scatter the shredded mozzarella over the mounded filling, then bake for 5 more minutes until the cheese melts and stretches. Serve these warm with small forks and napkins, since the juice runs a little.
Candy Corn Fruit Skewers
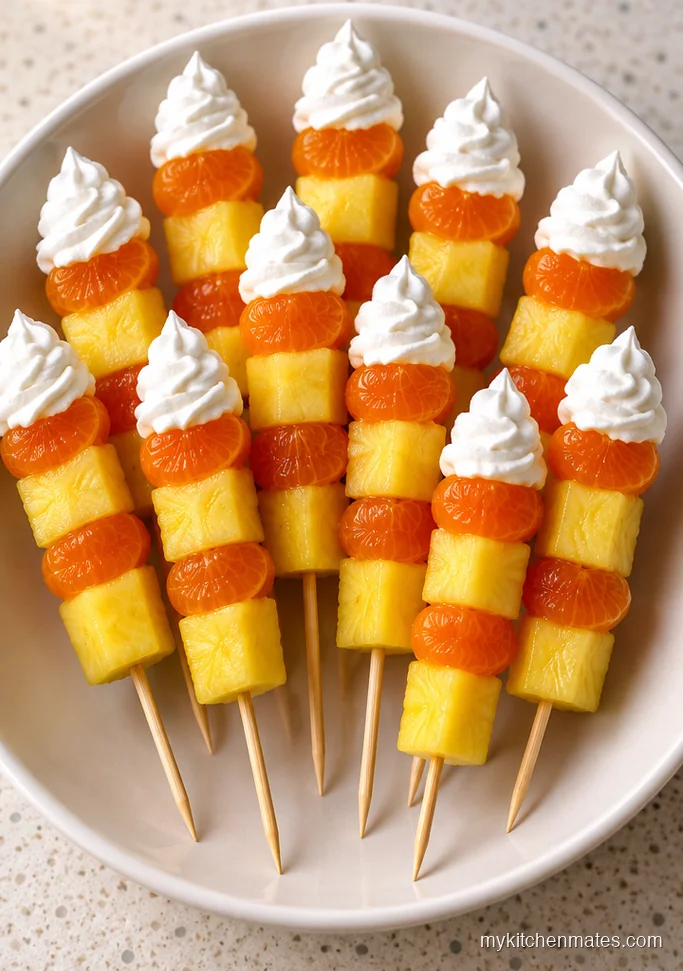
This is the dessert option that does not require you to turn on the oven, and it is bright enough to sit on the snack table untouched until someone notices the colors. The three layers are just pineapple, orange, and whipped cream, but the effect is pure candy corn.
Ingredients (makes 10 fruit skewers)
- Fresh pineapple, cut into chunks: 250 g (2 cups)
- Large mandarin oranges, peeled and segmented: 3
- Whipped cream or vanilla yogurt: 120 g (1/2 cup)
- Small wooden skewers: 10
Instructions
Step 1: Thread a pineapple chunk onto the bottom of each wooden skewer, pushing it down so the skewer tip is still exposed at the top. You want the yellow at the base to anchor the candy corn gradient.
Step 2: Layer one or two mandarin orange segments above the pineapple on each skewer. The orange should sit snugly against the yellow with no gap, so pick segments that are wide enough to cover the skewer.
Step 3: Spoon a small dollop of whipped cream or vanilla yogurt onto the tip of each skewer, right above the orange. If the cream is too loose, chill it first so it holds its shape instead of dripping down the fruit.
Step 4: Set the finished skewers on a plate in a single layer and chill them for 15 minutes before serving. The cold helps the cream set and keeps the fruit crisp and juicy.
Step 5: Arrange the skewers in a fan shape on a white plate so the white orange yellow pattern reads from across the room. These disappear fast, so make a double batch if you have more than a few kids coming.
Graveyard Taco Cups
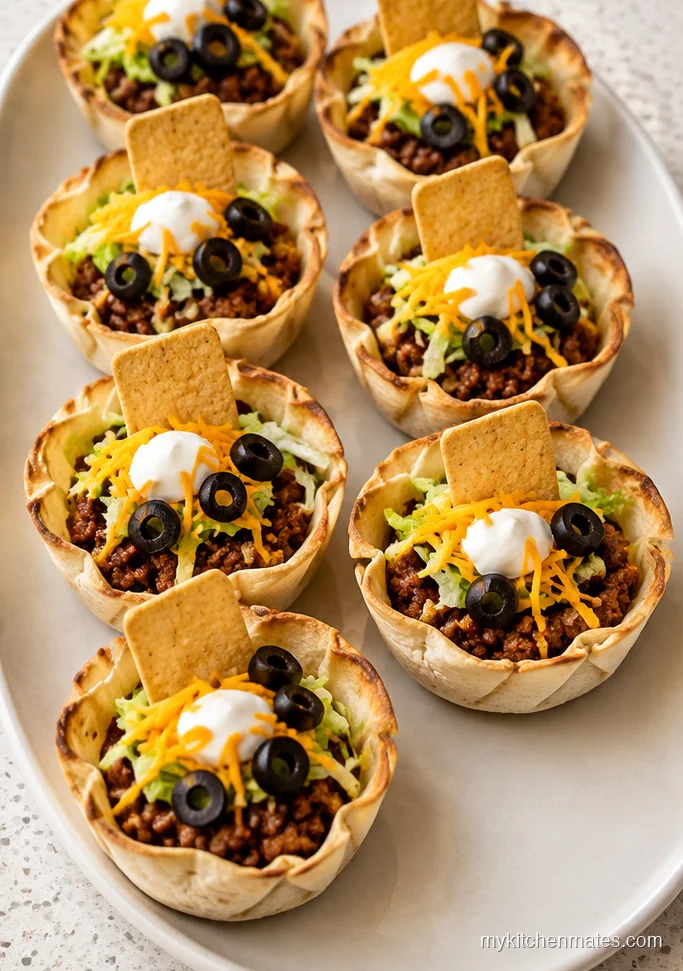
These are the most interactive option on the list, since everyone builds their own little graveyard from a crunchy tortilla cup and a pile of toppings. They look like tiny tombstones poking up from a bed of seasoned beef and lettuce, and they hold together better than flat nachos.
Ingredients (makes 12 taco cups)
- Small flour tortillas: 12
- Ground beef: 450 g (1 lb)
- Taco seasoning: 2 tbsp
- Shredded lettuce: 100 g (2 cups)
- Shredded cheddar: 120 g (1 cup)
- Sour cream: 120 g (1/2 cup)
- Rectangular tortilla chips: 12
- Black olives, sliced: 2 tbsp
Instructions
Step 1: Heat your oven to 350F (175C) and press each small tortilla into a cup of a 12 cup muffin tin, folding the edges so they fit and stand up like a little bowl. Bake them for 8 minutes, or until the tortillas turn crisp and hold their shape.
Step 2: Brown the ground beef in a skillet over medium heat, breaking it into small crumbles as it cooks. Stir in the taco seasoning and a splash of water, then simmer for 2 minutes until the seasoning coats every piece.
Step 3: Spoon the seasoned beef into the baked tortilla cups, filling each one about halfway. Top with shredded lettuce and a handful of cheddar so the cups look full but not overflowing.
Step 4: Stand one rectangular tortilla chip upright in the center of each cup to be the tombstone. You can pipe a little sour cream onto the chip first and stick black olive slices to it to spell out RIP or just leave it plain.
Step 5: Dollop a small spoonful of sour cream on the beef around the tombstone so it looks like fog, then set the cups on a platter. Hand them out with napkins, since the first bite sends a few lettuce shreds over the side.
Whatever you decide to make, the thing that separates a good Halloween snack table from a chaotic one is having one warm, one cold, and one sweet option out at the same time. Pick your three from this list, make the dips and skewers ahead, and save the baked items for the last half hour.
Cook the one that makes you excited to set the platter down, and the rest of the party will follow.
